Hey y'all. Shan here. Happy Monday! I hope you had a great weekend. I am still recovering from my sinusitis/asthma which has had me feeling pretty cruddy. Needless to say, I was feeling the need for some serious "Comfort-Food" this week-end.
Now, I know I said I would leave most of the cooking to the big-dog food bloggers, but every once-in-a-while, I've got a recipe that I've got to share with you. One that's been friend tested and approved and begged for seconds on more than one occasion ... and this, friends, (because we're friends right?) is just one of those recipes. I even took step by step photos with my crappy BB for you, cuz that's what friends do.
I'll put the list of ingredients for you at the end. Here's a picture of the finished product just to get you drooling-

Look at all that Cheesy, buttery, creamy, mashed, potato goodness sitting atop that Guinness soaked portobello, onion, vegetable beef mixture on the bottom. YUM! Uhhh- Did you catch the Guinness Part? Uh-Huh! Like I said- Updated! You're gonna want to thank me.
Here's a picture of the ingredients-
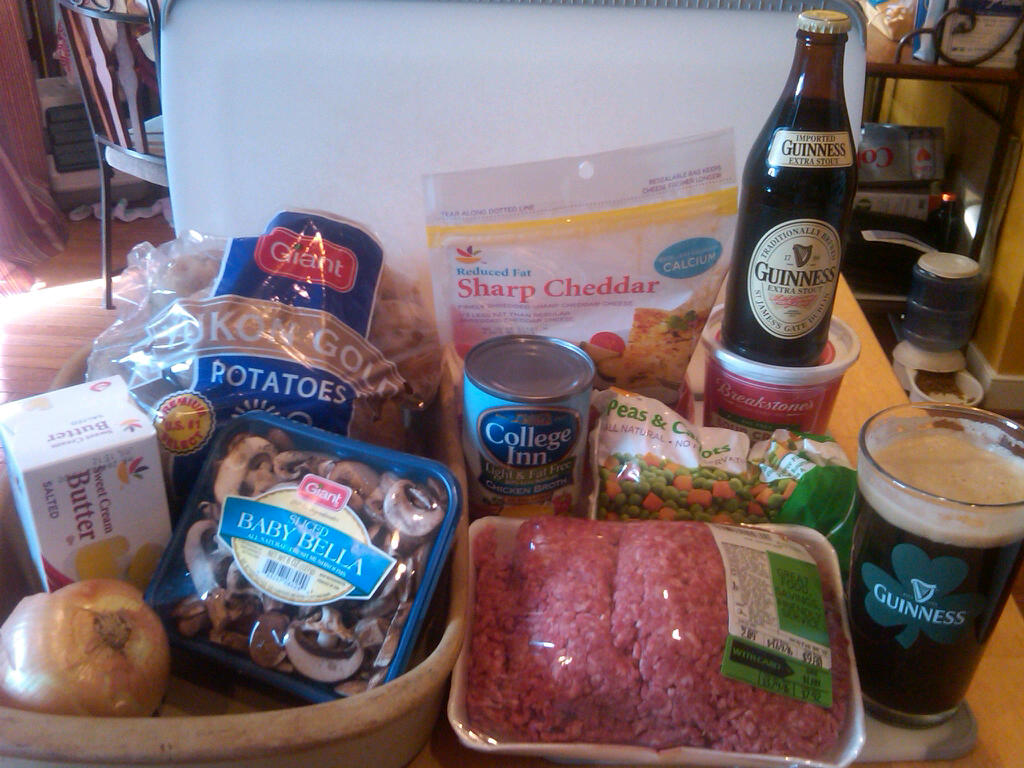
Sorry I didn't have a better background for you. I'm primarily a craft blogger and not a food blogger. Please note the 2 Guinness' in the picture. Only one is for the actual recipe. the one in the glass is for me as I cook. (Note the still nice head on it, even after multiple attempts at getting just the right photo composition (: ) It definitely makes the cruds not quite so bad. Also optional is my favorite cooking music- RiverDance playing in the background.
First off- I start by peeling the potatoes. They are the most time consuming. This whole recipe took about two hours start to finish. I used a 5lb bag of Yukon Golds. 5 lbs. sounds like a lot, but by the time you peel them down and get them cut up not really so much. See-
 |
| Sorry, I couldn't get it to rotate ): |
I like the Yukon Golds because they have a buttery flavor. You want to make sure to cut them up into fairly small uniform pieces so they cook evenly. I halve all mine and then cut in half or thirds and then that again.

That 5lb bag is not even fully covering my cutting board. Boil until fork tender and drain. We'll come back to these later.
While you are cutting your potatoes, if you are especially proficient at multi-tasking you could start to brown your ground beef. I use lean ground beef instead of the traditional lamb.
*Tip*- I guess if you were Vegetarian you could use Crumbles in place of beef for this.
Once the meat is cooked thoroughly, drain and set aside.
Take 1 medium yellow or Vidalia onion and chop it up into small to medium pieces.

*Tip* - I learned this in cooking class- The fewer cuts you make when cutting an onion the less chance it will irritate your eyes. Also leave the knots on at the ends to help hold everything together. Let the onion help you.
Saute your onion in a couple tablespoons Olive Oil, I like Extra Virgin, until the pieces are soft and just about to caramelize.
While your onions are sauteing, finely chop your baby portobello mushrooms. I got the ones that were already sliced, because it made my job a little easier. Portobellos have a real "meaty" flavor to them and are a nice extra to be able to add to the dish. They are another little update to this old comfortable standby.

Add these to your onions and cook for just a few minutes until soft.
Add your beef back to the pan, add your bag of frozen peas and carrots (I set mine out on the counter to thaw while I'm doing my prep work) and last but not least, add your bottle (or can, whichever you have) of Guinness.

I really wish your computer had "Smell-O-Feature" and you could just get a whiff of this right now. It is unbelievable. Trust me. I want you to promise me you won't eat all of this before it makes it to the baking dish. Promise.... because, let me tell you... You're going to want to. Season with some Kosher salt or Sea Salt and some fresh ground black pepper to taste and stir occasionally and wait as the Guinness reduces down. It's torture, I assure you, but oh so worth it. When you sneak those spoonfuls that you're going to sneak, you'll see what I mean. The flavors are simply Amazing. The Guinness surprisingly doesn't really hit your flavor palate until the end, just a subtle, "Hey, How you doing?" But, it's so worth it. Seriously, it makes the dish.
While the Guinness is reducing, take a stick of butter (yes I'm channeling my inner Paula Dean) and slice it up and put it with the potatoes. Then take a 16oz container of Sour Cream (I used Fat Free, You'll never know the difference, and it offsets the butter a little) and put it in with the potatoes. Give them a rough mash with a masher and then fold gently to mix. I like my potatoes a little lumpy, it's a texture thing. You can make yours to suit you.
*Tip*- The more you mash your potatoes the starchier and stiffer they will become, the less you mass the lighter and fluffier.

Look how Pretty! If you noticed in the original picture with ingredients, there's a picture of Fat-Free, Low- Sodium Chicken Stock. I put that in just in case the potatoes needed a little extra moisture, but they were so light and creamy I didn't need it. Sometimes, I use Half and Half, but I put this in as a lighter alternative.
Once the potatoes are ready and your Guinness has reduced down, layer you meat mixture in the bottom of a 9 x 13 baking dish. I used this Stonewear one from Pampered Chef. It's Amazing.

Next add your creamy potatoes, and top with cheese. I used 8 oz of Sharp cheddar. I baked in the oven at 400F for 20 minutes, just long enough to melt the cheese and heat everything through.

How Yummy does that look? You know you want to just grab a spoon and dig in! This would make about 9-12 servings. I cut us a slice so don't worry.
Try not to burn your tongue eating it before it's cooled! :)
I hope you'll try my updated comfort food and let me know what you think. I hope you like it as much as my family and friends do.
Here's the ingredients list-


That 5lb bag is not even fully covering my cutting board. Boil until fork tender and drain. We'll come back to these later.
While you are cutting your potatoes, if you are especially proficient at multi-tasking you could start to brown your ground beef. I use lean ground beef instead of the traditional lamb.
*Tip*- I guess if you were Vegetarian you could use Crumbles in place of beef for this.
 |
| This tool is from Pampered Chef and is great for ground meat recipes. |
Take 1 medium yellow or Vidalia onion and chop it up into small to medium pieces.

*Tip* - I learned this in cooking class- The fewer cuts you make when cutting an onion the less chance it will irritate your eyes. Also leave the knots on at the ends to help hold everything together. Let the onion help you.
Saute your onion in a couple tablespoons Olive Oil, I like Extra Virgin, until the pieces are soft and just about to caramelize.
 |
| Yum |

Add these to your onions and cook for just a few minutes until soft.
Add your beef back to the pan, add your bag of frozen peas and carrots (I set mine out on the counter to thaw while I'm doing my prep work) and last but not least, add your bottle (or can, whichever you have) of Guinness.

I really wish your computer had "Smell-O-Feature" and you could just get a whiff of this right now. It is unbelievable. Trust me. I want you to promise me you won't eat all of this before it makes it to the baking dish. Promise.... because, let me tell you... You're going to want to. Season with some Kosher salt or Sea Salt and some fresh ground black pepper to taste and stir occasionally and wait as the Guinness reduces down. It's torture, I assure you, but oh so worth it. When you sneak those spoonfuls that you're going to sneak, you'll see what I mean. The flavors are simply Amazing. The Guinness surprisingly doesn't really hit your flavor palate until the end, just a subtle, "Hey, How you doing?" But, it's so worth it. Seriously, it makes the dish.
While the Guinness is reducing, take a stick of butter (yes I'm channeling my inner Paula Dean) and slice it up and put it with the potatoes. Then take a 16oz container of Sour Cream (I used Fat Free, You'll never know the difference, and it offsets the butter a little) and put it in with the potatoes. Give them a rough mash with a masher and then fold gently to mix. I like my potatoes a little lumpy, it's a texture thing. You can make yours to suit you.
*Tip*- The more you mash your potatoes the starchier and stiffer they will become, the less you mass the lighter and fluffier.

Look how Pretty! If you noticed in the original picture with ingredients, there's a picture of Fat-Free, Low- Sodium Chicken Stock. I put that in just in case the potatoes needed a little extra moisture, but they were so light and creamy I didn't need it. Sometimes, I use Half and Half, but I put this in as a lighter alternative.
Once the potatoes are ready and your Guinness has reduced down, layer you meat mixture in the bottom of a 9 x 13 baking dish. I used this Stonewear one from Pampered Chef. It's Amazing.

Next add your creamy potatoes, and top with cheese. I used 8 oz of Sharp cheddar. I baked in the oven at 400F for 20 minutes, just long enough to melt the cheese and heat everything through.

How Yummy does that look? You know you want to just grab a spoon and dig in! This would make about 9-12 servings. I cut us a slice so don't worry.
|
| ENJOY! |
Try not to burn your tongue eating it before it's cooled! :)
I hope you'll try my updated comfort food and let me know what you think. I hope you like it as much as my family and friends do.
Here's the ingredients list-
1 ½-2 lbs lean ground beef
1 berry basket Portobello mushrooms
1 medium yellow or Vidalia onion
1 frozen bag of mixed peas and carrots
1 5 lb bag of potatoes- I like the buttery Yukon gold
type (depends on how much potatoes you like
1 16oz container of sour cream
1 stick of salted butter
1 12oz Guinness
Olive Oil 1-2 tablespoons
8oz (2 cups) cheddar cheese- for topping (I used Sharp)
Kosher Salt (or Sea Salt) and Fresh Ground Pepper to taste.
Hey- I'm trying a link party for the first time so, give a little luv to Paige over at The Sweet Spot who's hosting her first ever link-party.
Hey- I'm trying a link party for the first time so, give a little luv to Paige over at The Sweet Spot who's hosting her first ever link-party.
Till next time-
Remember- Life is not about Waiting for the storm to pass- It's about learning to Dance in the rain
Be Safe,
Shan
Shan


