Thursday, July 12, 2012

Healthy New Recipe. Greek Quinoa Salad with Grilled Shrimp

Pin It

Hey ya'll. Hope you're having a Fabulous week! Just one more day till the weekend. Woo-Hoo! :)

I just posted this over on my A Better Shan blog and thought I'd share it here for you too!

I have a new recipe for you today. I try to cook up food for the 2 weeks between paychecks on Sundays and I did some of that this past weekend. 3 new recipes. Yea Shan! As you may or may-not have heard last Sunday was day 11 of the longest and hottest Heat-Wave the DMV had ever had. Thankfully it stopped the next day but they are predicting high temps again this weekend. Any-whoo, I was kind of in the mood for a Greek Salad, but wanted something with a little more protein and lasting power. They had shrimp in nice little packs on sale at the grocery store and I got the yummiest idea for lunch. Instead of a regular salad or even a cold "pasta" salad, why not use Quinoa. It's good hot or cold, like pasta and so good in so many different recipes and I had a brand new package at home. So, why not combine the flavors of my Greek Salad with the extra protein of the quinoa for a new taste? I could hardly wait to get home and try it.

Greek Quinoa Salad with Grilled Shrimp
(Sorry, I just realized it's a little blurry. I was in a hurry to enjoy it!)

Here's what you need-
quinoa, shrimp, feta cheese, cucumbers, cherry/grape tomatoes, red-wine vinegar, Greek seasonings, chicken stock or base and anything else you normally enjoy in your Greek Salad. I'm not a big olive fan, love the oil not the olives, and am def. not an anchovie fan. No hairy little fishes in my salad, Thank You Very Much!

Ooops! I forgot the Greek Seaoning> :(

This is so easy and tasty, you're going to want to make some tonight.

1- Prepare your quinoa. I like this brand that I got at my local Giant, because it's pre-washed. Anything that makes my job easier and decreases my time in the kitchen (even though I love cooking) is great. I've been using Better than Bouillon instead of canned broth. It's concentrated, 1 tsp = an 8oz can of broth, and it takes up less space than all those cans, it tastes better than cubes and is more cost effective. I actually use 1/2 tsp /8oz and still get tremendous chicken flavor. Oh and it's 0 points. :)

2- While your quinoa is cooking go ahead and prepare your shrimp. Peel them, de-vein them if necessary and put them in a bowl.

Aren't these beautiful? All I had to do was shell them. The store had already de-veined them for me 

3- Remember to not throw away your shells. Put them in a plastic baggy and freeze them. You can use this to make stock later.


 4- Add just a skosh of olive oil and your Greek-seasoning to your bowl. You just want enough oil so that the seasonings stick. Mix until all the shrimp are coated with the seasonings. 

5- Grill those sweet little morsels up until they are pink and done. Not too long though because you don't want them to get dry. 

This made two servings


I used my George Foreman, cuz like I said it was a bajillion degrees outside, and look how scrumptious they look! All pink and yummy. I actually had them on skewers first but the lid didn't close all the way like that so I grilled them just on the plates like this and they turned out Fab!

6- While the shrimps are grilling, prepare the rest of your salad ingredients. I diced up some cucumber and sliced some little grape tomatoes. Your quinoa should be finished by now.

7- Once everything is cooked mix your veggies, shrimp and quinoa together and add just a splash of the red-wine vinegar (or more to taste). Top with your feta cheese and get ready for the taste explosion.

8- Enjoy your healthy meal. This meal is 8 W.W. Points Plus points and trust me worth every one. It's full of wholesome fresh food and the points come from the proteins, so eat up and enjoy! This meal is good served hot, but I think it's even better served with the quinoa cold.


Thanks so much for taking the time out of your day and stopping by today. I hope you'll give this recipe a try. If you do, I'd love to hear what you thought.

Till next time-

Remember- Life is often more about the storms than the peace they seek to overwhelm. It's not about Waiting for the storms to pass, but Learning to Dance in the rain.

Be Safe,
Shan
Pin It

Thursday, July 5, 2012

Cool New Dessert

Pin It
Hey y'all. I know it's been a while, but I've been crazy busy. I wanted to share a dessert with you today that is fabulous for anytime but especially those hot summer days when you want something cool, and delicious without being overly sweet or heavy and this cake fits those requirements perfectly. I took this to a cookout yesterday and let me just tell you it was gone almost as soon as it was cut! :)


Strawberry Cream Cheese Filled Angel-Food Cake (Sounds pretty decadent and points heavy, huh? Nope!) This is a No-Bake, No-Added Sugar, Fat-Free Recipe. Woo-Hoo!!!! And it's Yummy too! ;)

Look at all of that ooey, yummy goodness


Here's what you're going to need-


1 Angel-Food Cake- you could make your own but it's so easy to just buy them pre-made then you don't even have to turn on the oven for this yummy treat
1 Large package of fresh strawberries
1 bar of Fat-Free Cream Cheese at room temperature
1 lemon


Here are your instructions-


1- Wash and hull and your strawberries-

It's ok if you want to snack on one or two of these little beauties
2- Slice off the top of your Angel-Food Cake and make a little tunnel all around the inside-


Don't throw out those bits of cake you're going to use them in the next step.

3- Cube up the cake you scooped out and put them in your food processor with half the strawberries and your room-temperature cream cheese cut into cubes. Blend until everything is well mixed.


4- Take that wonderful mixture and spoon it into the tunnel in your cake.


Oooh so yummy! Just lightly sweetened from the strawberries. :)

5- Put the top of the cake back on and put in the refrigerator to chill and let the cream cheese filling firm back up.

6- Take the other half of your strawberries and the juice of your lemon and puree them in your food processor/blender.


This is Amazing! Sweet with just a little tart from the lemon. Nectar, I tell you. Put this in a seal-able container and refrigerate. This is your topping. It sets off the sweetness of the cake and the richness of the filling perfectly.

7- Enjoy! I let my cake filling set for a few hours, Your time will differ depending on how cold your refrigerator is. Simply slice your cake and drizzle some of your Strawberry-Lemon goodness over your cake and get ready for the yumminess to hit your taste-buds.

Strawberry Cream Cheese Filled Angel Food Cake
Are you ready for the best part- Here's the points break-down-

If you cut it per the "serving-size" listed on the side of the cake this will yield 8 approximately 1" pieces. Each one inch piece is only 5 Points-Plus points. If you cut it into 1/2" pieces which is still enough to enjoy it's only 2.5 Points-Plus points. The picture above is a 1/2" piece.

As this is a refrigerator cake, it's perfect for hot days. The cool, creamy filling really hits the spot. Know what else hits the spot? Eating this and knowing you still have lots of points to use for other cook-out yummies.

I hope you'll give this a try. I'm sure you'll enjoy it! If you try it, I'd love to hear what you thought.

Adapted from Emeril

Thanks for stopping by today. I'm not posting as much as I'd like to be able to. I hope you'll subscribe by e-mail or reader so you don't miss anything. :) Till next time-

Remember- Life is often more about the storms than the peace they seek to overwhelm. It's not about Waiting for the storms to pass, but Learning to Dance in the rain.

Be Safe,
Shan

Pin It

Monday, April 9, 2012

New take on Macaroons - Lower Calorie Coconut Macaroons & Birds Nests

Pin It
Hey everyone! I'm baaaaack! :)

Sorry it's been so long in between posts. I've actually done a couple of things for this and just haven't gotten around to putting them in words. I'll try to do better.

Just a quick post today, but it's a yummy one!

Lent ended yesterday and boy was I glad! Every year I give up chocolate. Let me just tell you it makes for a rough 40 days. I always hope its going to jump-start my weight loss, but somehow it never works. :( The worse part is that's usually when I find all sorts of yummy chocolate related recipes. Go Figure.

I've been filling my Pinterest boards with all sorts of "I'm going to try this once Lent's over" pins. I found one for Nutella Birds Nests over at a great site called Two Peas and Their Pod. You should check it out, but finish looking here first, k.

Coconut Macaroons are one of my all time favorite cookies. I couldn't believe it when I realized I had never made them before. What in the world have I been doing with my time? LOL!

I couldn't believe all the different recipes for them. Some with butter, some with flour, some with Sweetened Condensed milk. How to choose, how to choose....Well, I channeled my inner Pooh Bear (come-on now you know you do it too) Think, Think, Think... and remembered this recipe I had seen on the Skinny Tastes site. She has lots of Amazing food and most are low or lower calories. This is a great site if your doing Weight Watchers. Check her out when you get a chance.

I decided to combine the two recipes and see what I could come up with. Since both sites are pretty comprehensive in their instructions I didn't do a step by step here, just the finished product. The Skinny Taste recipe is 3 points for 2 cookies and mine ended up just a little bigger than hers. She had 17 and I ended up with 14 but still pretty close.

Here's what I ended up with-

Skinny Coconut Macaroons
So Yummy! My stone is from Pampered Chef and it's well loved and worked great for this.

Here's some made into Birds Nests-

Nutella Birds Nests

I used under 1/2 tsp of Nutella, probably closer to 1/4 tsp which only added 50 calories to each cookie. I then added 3 little M&M eggs and they were done.

These were incredibly rich even without the butter or Sweetened Condensed Milk and the Nutella made them even richer. I only ate 2 and I was more than satisfied.

I hope you'll give these a try. They really are so Amazing, either way you make them. 

Enjoy! Oh, and I've linked this to The Sweet Spot's Link Party for this week. Check out all of the yummy foods over there.


Hope to see you back real soon. Till next time- Remember- Life isn't about Waiting for the storm to pass, but Learning to Dance in the rain.

Be Safe,
Shan
Pin It

Tuesday, February 7, 2012

Cheaper Brazilian Blowout/ Keratin Treatments

Pin It
Hey y'all. Shan here.

I know you're thinking two posts in a week, wow! I know. Don't get too excited, I don't know how often we'll get to do this. Did you go shopping for Shepherds Pie ingredients yet? You have to make that. I'm telling you, once you do, you are seriously going to want to thank me, and I'm going to let you. Cuz, it's just that good.

Today's post is all about saving money though. BTW- This is a long post- but hang with me, it's worth the money you're gonna save I promise you, Sick, make-up free pics and all. (I apologize in advance for those)

LOTS OF MONEY!

Ladies this is mostly for you, but guys if you want luscious, frizz free, straight, beautiful, glorious, locks, stick around I'll save you tons too!

Ok, Lot's of money, if you're like most women I know who want their hair to be frizz free. Believe it or not, Brazilian Blowouts/ Keratin Treatments aren't just about getting straight hair it's about being Frizz-Free.

I LOVE my curls. I have Julia Roberts in Pretty Woman, Kate Winslet in Titanic Beautiful Curls. I also however have Mr. Kotter Frizz. Growing up in the coastal region of Florida a few miles at most from the bay, during the school year, and a short run across the yard, in the summer, was pure bliss....for every aspect of my life except my hair styles. Having a beautician for a mother just made it worse. I simply can not tell you how many times I heard "If you don't look good, I don't look good." Oh Lawdy!" Vidal Sassoon and Good Catholic and Good Jewish guilt giving women the world over had nothing on her. What I wouldn't have given for a good Keratin treatment back then.

I can't tell you the times I spent hours, literally hours, straightening my hair, only to step outside and have the humidity do WICKED things do it. WICKED I tell you! It would never be equally horrible. Wavy on one side frizzy and flat on the other side. Horrible! We often resorted to, *shudder* perms, to try and equalize the curls and chemically calm the mess. My poor hair. ):

About 10 years ago I tried "The Chinese Straightener". It was supposed to last about a year. Whatever. It lasted about about a month and then it wasn't even worth the effort to blow out anymore so I just let it curl and frizz again, because you know, the DMV's weather is basically the same as Florida's, heat and humidity wise, we just get that pesky white stuff thrown in during the winter months.

Well about 2 years ago I decided to try the "Brazilian" Keratin treatment everyone was raving about. I went to my salon and forked over about $350 for the Marcia treatment. First off let me say 1- I have a really sensitive scalp. I generally wash my hair every day. By the time I get to 36 hours I get itchy. At 48 hours I'm usually clawing at my scalp so when I was told I was going to have to leave this on for 72 hours I was freaking out, but I decided I would try.  I really liked the Marcia brand treatment. My scalp felt really conditioned (it is after all a protein treatment) and there was no itchiness not even at the 72 hour mark. The second time my salon, unbeknownst to me had switched to the Coppola brand. Let me just say I am not a fan at all! Literally, as soon as this product hit my scalp I could tell the difference and even commented to my stylist that this was not the same product. By 24 hours, my scalp/hair felt greasy, by 48 hours it just felt dirty and itchy and luckily it could be washed out between 48 and 72 hours because there was no way it was staying on my hair any longer. Within days, my hair was not lying smooth. I went back in and had the treatment re-done with the Marcia Chocolate treatment and life was good again. My stylist also tells me these treatments can help extend the life of a good color treatment because it seals the hair shaft. So, while it won't do anything for your roots it may help your color stay more vibrant, as long as you're not using sulfate shampoos or other treatments that are stripping the color and keratin from the hair shaft.

If I choose to not blow dry my hair I can still wear my hair curly. It's not as curly as it used to be, it's much softer waves but there's no frizz. If I use hot rollers I get 80's Cosmo Cover kind of curls and hold. I haven't had to use a flat iron on my hair in probably over a year, almost 2. Life is good.

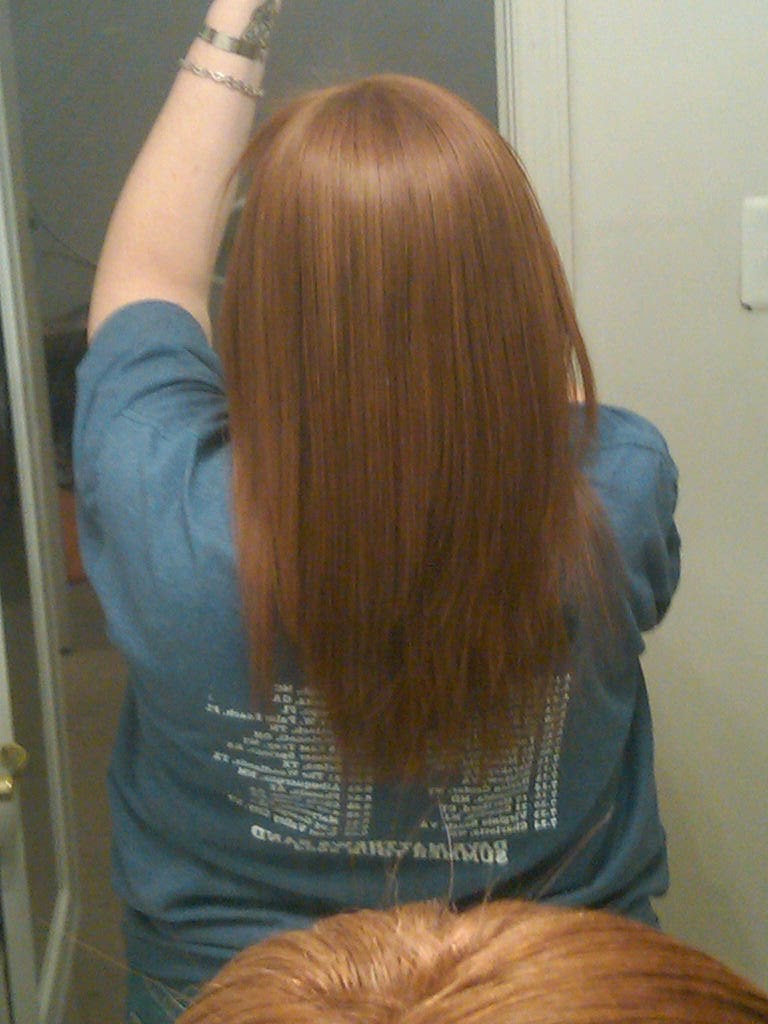
Also let me say that because I dislike the fact that my hair has often betrayed me in the past, there are very few picture floating around of me with curly hair. I have found 2 fairly recent ones prior to my first Keratin treatment so you can see how curly my hair is naturally.


See- Curls galore!
So I forked over my $350 for my treatment and I Loved it!

Now, I'm a nurse. Math is not my thing, but lets do a little math here-

Keratin Treatments are on average $350-600 per treatment and last 2-3 months.
If we go cheap at $350 and say you get the full 3 months that's $1400/year just for the Keratin alone.
If we go hi-end at $600 and say you need every 2 months that's $3600/year just for the Keratin.

Now add in your regular cuts and if you color or highlight add that too. See where I'm going? WOWZA!

What if I told you that you could get the same results for $167.88/year?

Look at that straight hair. Less than 15 minutes with only a blow-dryer and no iron of any kind. Hand to God!
Got your attention now, don't I? Read On-


Ok- So, you know I believe in store discount cards, We've already talked about Target and Sheetz cards. I have cards for my local grocery stores and pharmacies. The thing to remember with these cards is you can't buy stuff just because it's on sale. If you wouldn't buy it when it's full price, don't buy it just because it's on sale. It's not a deal if you're not going to use it.

That being said- Here's the next card that needs to be in your wallet or on your key chain. ULTA. Do you have one of these stores in your area? When you sign up for their card, which is of course free, you get their fliers, every few weeks like this one with $3.50 off coupon right on the front. (sorry about the tear, I always forget to take pictures first and tear later) Lots of times they have bonus coupons inside where you get bonus points for buying certain items in the store. I had 400 bonus points I could use when I went in this weekend so I got an additional $4.00 off my purchase. SWEET!

Now chances are I'm going to buy my shampoo and conditioner at Target since I get 5% off everyday, but if it's on sale at ULTA and I get bonus points too, then I might get it there. You gotta shop smarter and save that money. Here's what I went to ULTA for.

Check out that price $13.99
Just &7.99 each
Sorry about the wonky positioning Blogger's not letting me position where I want. The Keratin Treatment is only $13.99 and the Shampoo and Conditioner are only $7.99 each. I highly recommend using the shampoo and conditioner. They are sulfate free and will help your treatment last. No sense in doing the treatment and then stripping it out with shampoos that contain Sulfates.

I know you can' see it on the packaging but this Keratin Treatment is Formaldehyde FREE!


So have you been doing math with me? $13.99 for the Keratin Treatment - $3.50 in store coupon and - $4.00 in store bonus points. My Keratin treatment just cost me $6.49/month vs $116-200/month for the salon breakdown. But even at $13.99 still a steal, and just so you wouldn't doubt me, here's my receipt-


Want to know how hard this is and how long it's going to take? Ok, I took pics for you. I was sick as a dog but I still took them, for blogging posterity and all that.

*Most Importatnt Tip of ALL* I highly recommend doing this over the weekend say Friday night or at the beginning of your 2 day off stretch if  yours doesn't fall on the weekend. Your hair is not going to look it's most attractive at the end of the treatment period. Unless of course you thought the "Grunge" phase was a particularly good phase.

*2nd Most Important Tip* No hair clips, Pony-Tail Holders, rubber bands, barrettes, pushing behind the ears, bandannas, Sunglasses etc. All of these actions will leave impressions in your hair. If you want these impressions in your hair for the next month or so then feel free to disregard my 2nd most important tip.

Be prepared to spend about 2 hours start to finish the first night. More or less depending on the length of your hair. Mine is down to my bra, and there is a deceptive amount of it there (as my stylist likes is fond of saying)


This is really simple-


 Step 1-Wash your hair with this pre-shampoo. Follow the directions. Like I said I have a lot of hair and there's enough left over to do next months treatment. Towel dry. How hard is that?


Step 2- Follow the directions on this bottle. Apply to your towel dried hair and then wait 30 minutes. I used my 30 minutes to eat my dinner. Once again lots of extra solution. I have enough left over for next months treatment. Organix probably wouldn't like me saying that, huh?


Step 3- Blow dry Completely and then flat iron. This is the part that is time consuming. They recommend that you flat iron each section 7-8 times at a really high heat. They give the number and I don't want to mis-quote so you'll have to read the instructions. They say to not worry about the heat damaging your hair because the treatment protects your hair. You are in effect heat sealing the treatment onto the shaft of your hair.

Here are the Flat Irons I used. There is no need to use real expensive ones. These are Ionic ones I bought at Target. I used the Remington one all over and the Conair one I used for the fine Baby hairs around my face.


*TIP* Buy a comb specifically for this task as your hair is going to be extremely hot from the flat iron and you are not going to want to touch it to load it back into the iron. You'll need a new comb each treatment as the teeth will warp a little from the heat. (I told you it gets hot)

*TIP* Make sure to get the Iron as close to the root as possible and keep your wrist flat. You want your hair straight, no bends or curls in your hair. If you curl your hair as you iron it, that is likely what you will be stuck with for the next month.

*TIP* Work in small sections starting at the bottom and working your way up. Trust me on this. This is how they do it in the salons and this will work for you at home as well. Take your time and do a good job and you will be rewarded. (:


Here are my Pictures from Night 1. Even though I was sick I thought I would try and not scare you so I at least did minimal make-up and gave you eyes and lips. (: Please excuse the poor picture quality from my Black Berry. They may be good at many things, but quality photo taking is not one of them.


Here is day 2. You need to make sure that you give yourself time to flat-iron out any creases or  changes you may have created during sleep. It took me about 20 minutes that morning. I however took these pictures  late in the evening Day 2. Sorry, No Make-Up. I was way Sick and actually wasn't going to take pics at all, but figured I needed to go ahead and go through with it so, sorry in advance for the trauma, I'm about to inflict on you-


 And here's day 3 after work prior to the wash out. You need to let the treatment stay in for 48 hours. I don't think the pictures accurately capture how flat and greasy my hair was starting to look. I was so glad it was almost time to wash out. My scalp however, still felt great! I still look and feel like Crud (am on Antibiotics and oral and inhaled steroids in these pictures. Sure wish they would all kick in and start working!)


 Now for the reveal.- I washed the treatment out of my hair. I washed it twice with the Keratin shampoo, used the Keratin conditioner and then a dime sized amount of Organix Keratin Anti-Breakage Serum $7.99 for 3.3 oz at ULTA applied to towel dried hair and blew my hair dry.

Here's the results-


Sorry BB's take crappy pictures
I spent less than 15 minutes (closer to 10 actually) with my blow-dryer and medium round brush only to get these results. No Flat Iron!

Look How Smooth! 

Now isn't 2 hours/month, 24 hours a year (and truthfully my last treatment lasted me two months, just saying) worth saving $1232.12-$3432.12 in the salon? 

What could you do with an extra $1232.12-$3432.12 each year?
Just Imagine!!!!

Seriously, this is Formaldehyde free and my hair looks and feels AMAZING! I wash it at night and get up in the morning and simply run a brush through it. I don't have to blow it dry, iron it nothing. I will never pay for another Salon treatment again! Why would I? Why would you?

Now if you happen to have an extra $1200-$3500 a year that you just feel like throwing away, feel free to throw it my way, but I sure hope you'll give this a try.

I can't guarantee of course that you're going to have the same exact results that I did, I got 2 months, Organix says it's a 30 day treatment. They also have a 14 day treatment. But, it's a well known company, isn't it worth a try?

I hope you'll let me know if you give it a try.

I just want to say that the opinions listed here are my own opinions and that I have not been compensated in any way. 

But, If you like it, and you end up saving lots of money and you want to go out and say thanks with those fabulous, luscious, locks....Let me know! ;)

Hope to see you back here soon. Also if you liked this post feel free to friend or follow.

Till next time-
Remember- Life is not about Waiting out the storm - It's about learning to Dance in the rain.

Be Safe,
Shan


Pin It

Monday, February 6, 2012

Updated Comfort Food - Guinness Shepherd's Pie

Pin It
Hey y'all. Shan here. Happy Monday! I hope you had a great weekend. I am still recovering from my sinusitis/asthma which has had me feeling pretty cruddy. Needless to say, I was feeling the need for some serious "Comfort-Food" this week-end.

Now, I know I said I would leave most of the cooking to the big-dog food bloggers, but every once-in-a-while, I've got a recipe that I've got to share with you. One that's been friend tested and approved and begged for seconds on more than one occasion ... and this, friends, (because we're friends right?) is just one of those recipes. I even took step by step photos with my crappy BB for you, cuz that's what friends do.

I'll put the list of ingredients for you at the end. Here's a picture of the finished product just to get you drooling-


Look at all that Cheesy, buttery, creamy, mashed, potato goodness sitting atop that Guinness soaked portobello, onion, vegetable beef mixture on the bottom. YUM! Uhhh- Did you catch the Guinness Part? Uh-Huh! Like I said- Updated! You're gonna want to thank me.

Here's a picture of the ingredients-


Sorry I didn't have a better background for you. I'm primarily a craft blogger and not a food blogger. Please note the 2 Guinness' in the picture. Only one is for the actual recipe. the one in the glass is for me as I cook. (Note the still nice head on it, even after multiple attempts at getting just the right photo composition (:  ) It definitely makes the cruds not quite so bad. Also optional is my favorite cooking music- RiverDance playing in the background.

First off- I start by peeling the potatoes. They are the most time consuming. This whole recipe took about two hours start to finish. I used a 5lb bag of Yukon Golds. 5 lbs. sounds like a lot, but by the time you peel them down and get them cut up not really so much. See-

Sorry, I couldn't get it to rotate ):
*TIP*- Start your water to boil when you start to cut your potatoes. You may want to use two separate pots. The water should be ready by the time you are done cutting everything up.

I like the Yukon Golds because they have a buttery flavor. You want to make sure to cut them up into fairly small uniform pieces so they cook evenly. I halve all mine and then cut in half or thirds and then that again.


That 5lb bag is not even fully covering my cutting board. Boil until fork tender and drain. We'll come back to these later.

While you are cutting your potatoes, if you are especially proficient at multi-tasking you could start to brown your ground beef. I use lean ground beef instead of the traditional lamb.

*Tip*- I guess if you were Vegetarian you could use Crumbles in place of beef for this.
This tool is from Pampered Chef and is great for ground meat recipes.
Once the meat is cooked thoroughly, drain and set aside.
Take 1 medium yellow or Vidalia onion and chop it up into small to medium pieces.


*Tip* - I learned this in cooking class- The fewer cuts you make when cutting an onion the less chance it will irritate your eyes. Also leave the knots on at the ends to help hold everything together. Let the onion help you.

Saute your onion in a couple tablespoons Olive Oil, I like Extra Virgin, until the pieces are soft and just about to caramelize.

Yum
While your onions are sauteing, finely chop your baby portobello mushrooms. I got the ones that were already sliced, because it made my job a little easier. Portobellos have a real "meaty" flavor to them and are a nice extra to be able to add to the dish. They are another little update to this old comfortable standby.


Add these to your onions and cook for just a few minutes until soft.

Add your beef back to the pan, add your bag of frozen peas and carrots (I set mine out on the counter to thaw while I'm doing my prep work) and last but not least, add your bottle (or can, whichever you have) of Guinness.


I really wish your computer had "Smell-O-Feature" and you could just get a whiff of this right now. It is unbelievable. Trust me. I want you to promise me you won't eat all of this before it makes it to the baking dish. Promise.... because, let me tell you... You're going to want to. Season with some Kosher salt or Sea Salt and some fresh ground black pepper to taste and stir occasionally and wait as the Guinness reduces down. It's torture, I assure you, but oh so worth it. When you sneak those spoonfuls that you're going to sneak, you'll see what I mean. The flavors are simply Amazing. The Guinness surprisingly doesn't really hit your flavor palate until the end, just a subtle, "Hey, How you doing?" But, it's so worth it. Seriously, it makes the dish.

While the Guinness is reducing, take a stick of butter (yes I'm channeling my inner Paula Dean) and slice it up and put it with the potatoes. Then take a 16oz container of Sour Cream (I used Fat Free, You'll never know the difference, and it offsets the butter a little) and put it in with the potatoes. Give them a rough mash with a masher and then fold gently to mix. I like my potatoes a little lumpy, it's a texture thing. You can make yours to suit you.
*Tip*- The more you mash your potatoes the starchier and stiffer they will become, the less you mass the lighter and fluffier.


Look how Pretty! If you noticed in the original picture with ingredients, there's a picture of Fat-Free, Low- Sodium Chicken Stock. I put that in just in case the potatoes needed a little extra moisture, but they were so light and creamy I didn't need it. Sometimes, I use Half and Half, but I put this in as a lighter alternative.

Once the potatoes are ready and your Guinness has reduced down, layer you meat mixture in the bottom of a 9 x 13 baking dish. I used this Stonewear one from Pampered Chef. It's Amazing.


Next add your creamy potatoes, and top with cheese. I used 8 oz of Sharp cheddar. I baked in the oven at 400F for 20 minutes, just long enough to melt the cheese and heat everything through.


How Yummy does that look? You know you want to just grab a spoon and dig in! This would make about 9-12 servings. I cut us a slice so don't worry.

ENJOY!

Try not to burn your tongue eating it before it's cooled! :)

I hope you'll try my updated comfort food and let me know what you think. I hope you like it as much as my family and friends do.

Here's the ingredients list-


1 ½-2 lbs lean ground beef
1 berry basket Portobello mushrooms
1 medium yellow or Vidalia onion
1 frozen bag of mixed peas and carrots
1 5 lb bag of potatoes- I like the buttery Yukon gold type (depends on how much potatoes you like
1 16oz container of sour cream
1 stick of salted butter
1 12oz Guinness
Olive Oil 1-2 tablespoons
8oz (2 cups) cheddar cheese- for topping (I used Sharp)
Kosher Salt (or Sea Salt) and Fresh Ground Pepper to taste.

Hey- I'm trying a link party for the first time so, give a little luv to Paige over at The Sweet Spot who's hosting her first ever link-party. 
The Sweet Spot

Till next time-

Remember- Life is not about Waiting for the storm to pass- It's about learning to Dance in the rain

Be Safe,
Shan
Pin It